Wednesday, 15 August 2012

Buffy Cake

I think that small cakes make great presents, and this week I made two of them.  One was a birthday cake for a Buffy fan, and one was to say thanks to someone.  Bet you'll never guess which one is which :)

The Buffy cake was made after a quick search on the internet for ideas, and combining a couple of different designs that others had made.  My hubbie did the writing and outline for me which was a big help.  To get the image, I printed a picture off the internet and then reduced it to the right size so that I could trace it onto baking paper.  Then I lay the paper onto thinly rolled fondant and cut around the tracing with a scalpel, and stuck it in place on the cake with a little sugar water.  The black outline was added with a food-safe pen once the fondant had dried.  The flowers for both cakes are really simple - I will blog about tips for making flowers soon.

Both of these cakes were made using a new chocolate mudcake recipe - you can find it by Googling for 'Pam's Chocolate Mudcake'.  Apparently it a recipe that a lot of cake decorators use as it is quite dense, but also moist.  I have found a couple of different versions, and so am working my way through them to see which is best!  The layers of ganache within the cake are particularly tasty :)

-N-

Monday, 6 August 2012

A New Cake Class

I didn't realise that it had been quite so long since I last blogged, until I went through the photos of cakes that I have made, but haven't written about yet!  So, I might start off with the most recent and then make my way back.
Last weekend I spent two days at www.cakelovecouture.com.au learning how to make this two tiered cake.  It was a lot of fun to make, and I learned heaps.  I found that this class spent a lot longer on the preparation side than other classes that I have been to previously.  I have covered square cakes before, but the corners have always turned out a little rounded, and now I know why!  It's all to do with the super-smooth layer of ganache underneath.  It took me a while to get the hang of the corners, but I got there in the end.  I also learned some handy tips on how to tier the cakes so that they don't collapse, and how to get the 'ribbon' of pale fondant to go on in one strip.  The flowers were fun to make too - I will be making them again as they were really easy and look effective.  When I use some of my new tips on my next cake/s I will take photos along the way and share ideas.  

On another note, I have put in an entry form for the Perth Royal Show!  As this stage I will be trying decorated biscuits and a celebration cake.  Eeeek!  What have I gotten myself into???

-N-

Thursday, 10 May 2012

How to make a Dolly Varden Cake

I know that some of you out there don't know what a dolly varden cake is, but I was asked to make one for a 21st birthday.  Of course I said that I could make it, even though I hadn't made one before.  How hard could it be?  Obviously it ended up taking far longer than I thought, so I decided that I would share some of my tips with you.

This is the version that I made.  There are far easier and far more difficult versions to make, but the birthday girl got to choose what she would like.  The dolly varden itself is a doll 'pick' (so just the top half of the doll) inserted into a mud cake (the tin took the mix of a 23cm tin), and the bottom layer is a 28cm round mud cake.  So it was pretty heavy by the time I finished all of those layers of fondant.  It was made to serve 50 people for dessert.

I have found it quite difficult to work out portion sizes - most sources that I have found have indicated very small pieces of cake.  My guess for this one was that a 28cm round would serve 30ish people for dessert, and a 23cm round mix would serve 20ish.  Does anyone out there have suggestions?

Anyway, back to the decorating.  I watched a couple of youtube clips and read some sites to glean information.  Here are the most useful tips that I discovered:

1.  Using a dolly varden tin: I usually line my tins when making mud cake, but I couldn't work out a way to line this one due to its dome shape (I tried, but gave up after about half an hour of failed attempts).  Instead I sprayed the inside with cooking spray and sprinkled flour in it as well until it was entirely covered, and just lined the base with baking paper.  I was also concerned about the outside of the cake cooking before the middle, as it's quite a deep tin, so I lined the outside of the tin with newspaper.  The cake came out really well and didn't stick at all.  Also, be careful as this is a really unsteady tin.  I have heard about cooking disasters where the cake tipped over and cooked in the bottom of the oven, so be careful if you use one.  I got my hubbie to hold the sides of the tin while I spooned in the mixture, and then sat the tin on a biscuit tray before putting onto the oven rack. This seemed to work pretty well.

2.  Making the fondant bodice:  Next time I make this, I will take photos as I go along so that my descriptions are a little easier to follow.  The best tip that I found for attaching the fondant top, was to cover the doll's head and hair with cling wrap before you start so that it doesn't get all sticky.  Then cut out a long rectangle (~7cm wide) from fondant so that you can make the bodice.  It sticks easily with a little sugar water.  Leave the doll aside to dry while you make the skirt.  Once the fondant has dried, take off the cling wrap and try to do something with the doll's hair.  It is much easier to brush before the doll goes into the cake!

3.  Making the skirt:  This was the part that took the longest.  First cover the whole cake with fondant so that you maintain the shape and freshness of the cake, and let this layer set overnight. 

The pleats:  To make the pleats in the skirt, roll twelve fondant 'logs' which are ~1cm in diameter at one end and gradually taper to a point.  My fondant logs were ~13cm long - just measure the height of your cake to know how long to make them.  Attach these logs to the cake with a little sugar water, placing the tapered end up (spaced evenly around the cake).  The wider your logs are, the more bouffant your skirt will become.

The layers:  I took a bit of a guess about the layered skirt effect, but rolled the fondant ~0.5cm thick and cut out a large circle, using the base of the dolly varden tin as a guide (none of my circle cutters were large enough).  I then cut a smaller circle in the middle using a circle cutter and split one edge of the circle so that it would fit around the bottom of the cake.  This is the bottom layer of the skirt.  I attached this with sugar water, and then repeated the process for the next layer.   The top layer was a similar process, but I needed a much larger circle of fondant, and so I used a dinner plate as a guide.  This allowed plenty of fondant to create the pleats in the skirt. 

The dress:  The next step was to put the doll in the top of the cake, and make the purple sash so that it all looked like one dress.

4.  Putting the cake together: I covered the bottom cake and board with fondant, and let them dry overnight before putting the two cakes together.  Make sure that you remember to add support/dowels to the bottom layer so that the heavy cake on top doesn't sink or make the whole thing collapse.

5.  The piping:  I really need to practise my piping skills some more.  I find it quite difficult, and really didn't want to ruin all of my hard work with terrible piping.  So I piped the writing on a layer of fondant, and when I was happy with it (6 attempts later) I attached the layer of fondant to the cake.

So, all of that is probably really confusing without photos, but I hope that some of the ideas help if you are trying a dolly varden cake.

-N-


Fondant Covered Biscuits

I had never thought of using fondant icing to decorate biscuits until I went to the Everything Baking Expo earlier this year - I had only ever used royal icing before.  There was a great demonstration about using fondant icing, and the demonstrator showed us lots of different techniques.  Cook the biscuits as usual using whatever cutters you like, and then when cooled, use the same cutter to cut out the fondant.  Stick the fondant on with a little sugar water using a thin paint brush.  Next add embellishments.  It's a really effective way to make a nice little gift.  
 
There are loads of different biscuit cutters to choose from, and they're not very expensive (which makes it quite dangerous when browsing for new ones :)   These are pictures from the biscuits I made for a baby shower, and I also made biscuits for Easter this year.  I have another order for a baby shower next weekend.

If there ever comes a time when you're sick of eating cake - eat biscuits instead!

Oh - and have you ever done a 'vanity search' on the internet for your name?  Mine never comes up, but I have been checking to see if any of my cakes appear when using Google image search.  My volleyball cake has made page 3 of the image search :)  Small things...

-N-

Saturday, 28 April 2012

Volleyballs and Handbags

April has been a busy cake month for me, with four big cakes, plus a order of iced biscuits for a baby shower. It has been a lot of fun putting all of these cakes together, but they all took a whole lot longer than I thought that they would!

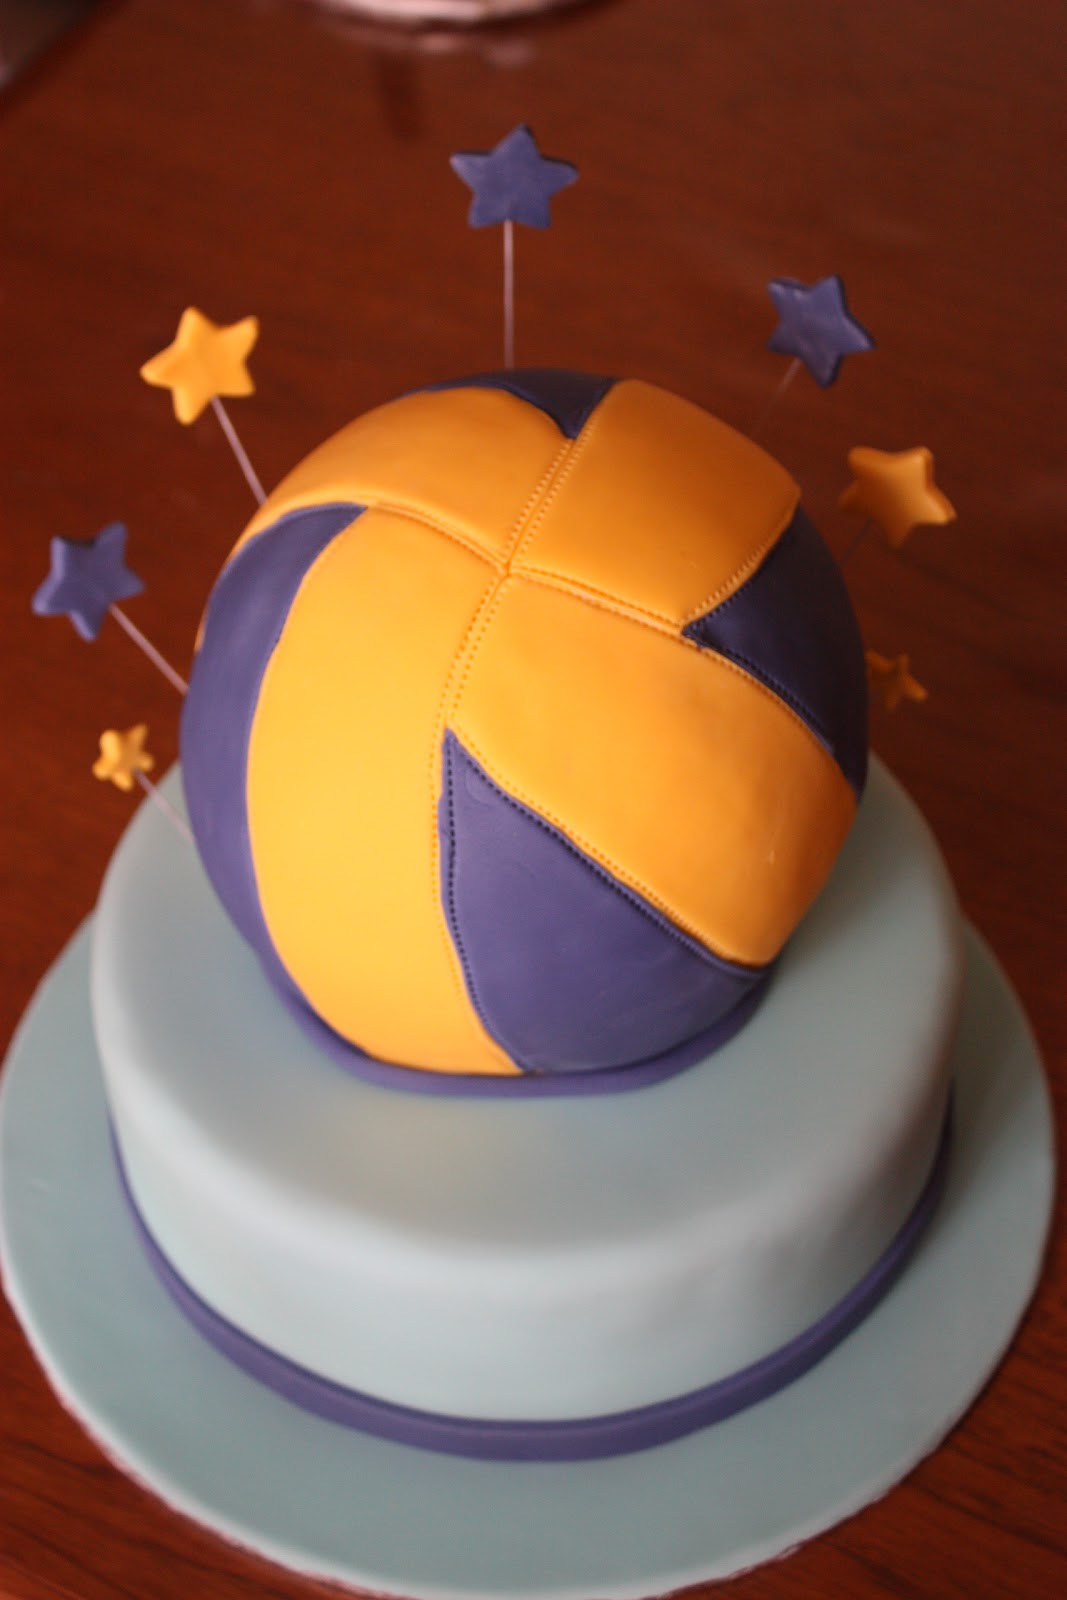
So firstly, the volleyball cake.  It actually turned out looking more like a volleyball than I thought it would.  There was a minor drama when the first cake cracked through the middle.  I would usually just try and stick it together with icing, but I thought that it was asking a bit much to expect the ball to look round when I finished, if it was falling apart before I started :)  Anyway, the second one came out of the tin intact and I learned from my trial run and took a lot of time to make the buttercream layer smooth.  I had to re-do the blue icing a couple of times as my pattern didn't work as well this time, but I was happy with the end result.  A tip for making the stars on wires - this is really easy and really effective.  Roll the icing a little thicker than if you were going to put the fondant cut-outs on the cake so that you can put the wire through without tearing the icing.  Dip the end of the wire in a little cake-friendly 'glue' (aka sugar glue from cake decorating shops), then thread on the fondant stars.  You can get different gauge wire from cake decorating shops so that the wire stands up straight, or bends a little.  Just make sure that you buy the wire from a cake decorating shop so that you know it is cake-friendly and not going to poison your guests.  I usually make these the day or so before so that the fondant dries (leave them to dry standing up in a glass or something otherwise the fondant will stick to your table) and only leave the wire in the cake the same day that you serve it.

The handbag cake also turned out well.  Probably the hardest part was attaching the handbag chain that I had been given to add to the cake.  I didn't want any of the metal to go into the cake, and so encased the ends in fondant and attached it to the outside. 
Getting the cakes to the venue was interesting.  Thankfully my hubbie was home and so he drove while I held the handbag cake.  It seemed a little top-heavy and I was worried that it might topple over.  I took some back-up icing and flowers so that I could fix (or hide) any cracks that might appear, but there was no need, and both cakes arrived intact.
The next cake is for another 21st birthday... a dolly varden cake.  I think that some of you have no idea what that is - stayed tuned :)

-N-


Saturday, 24 March 2012

Volleyball Cake Attempt Number 1

So, if you remember from my last blog entry, I need to make a volleyball cake in 3 weeks' time.  All I can say is that I'm glad I did a trial run first.

To start with, the oven at our new rental isn't great.  The cake took a lot longer to cook, and when I cut the top off, the centre looked uncooked (even though the skewer came out clean when I tested it).  Needless to say, I'll be cooking the cake again to see if I can sort it out.  Otherwise I might be needing to borrow an oven for a few hours.

I cheated and used Wilton's Sports Ball Pan so that the cake would be round to start with.  But I found it really difficult to continue with the shape.  Adding the buttercream layer meant that the side went a bit wonky, which was exacerbated as I added the layers of fondant.  So my volleyball ended up looking a little deflated.  When I make the real one, I will have to make sure that each layer follows the shape of the cake.

My friend Vic, who is a superstar cake decorator, suggested that I cover the whole thing with a layer of fondant first, and then add a second layer to make the coloured pattern.  I think that this made it a lot easier.  I was pretty happy with my attempt at the pattern - the Wilton tin comes with a template of the regular volleyball pattern, but as the birthday girl plays with a particular patterned ball, I thought that I would have a go.  The real one will be different colours, but at least I now have a template.

The last thing to try was the writing on the ball - I think that the brand name turned out ok, but that might be the extent of the patterns.  Drawing really isn't my strong point.

So, although my volleyball looks a little flat and dented, I think it's a good starting point.  Fingers crossed that the real one is better!

-N-

Friday, 16 March 2012

Cake with a Splash

So... it's been a while.  The joys of looking for a rental, moving and unpacking has delayed my cake-making for a while, but I have started again! Here is my first cake for 2012.  I was asked to make a diver cake for a colleague's husband's 40th, and here it is.


Diver Cake
Cake decorating classes can be quite expensive, so I've been trying to teach myself some new cake decorating techniques from books and cake tv shows.  So I bought myself some moulds of shells and starfish, and learned how surprisingly easy it is to create sea-life.  The blue water is just piping gel spread over the dry fondant.  I still haven't quite got the knack of marbling colours together, so my blue fondant just turned into one colour, but the gel takes care of that.
 
The only figurine that I had made before was a teddy bear, so I was pretty happy with how the diver turned out.  The tip that I got from a book was that with making figurines of people, you start with the head so that the features of the face are in proportion.  Apparently with animals, you start with the body.  The head and body are joined by a toothpick for some extra support (the toothpick nearly poked through the top of his head, but I saved it just in time!)  I probably could have made him a little bigger, but I think that it turned out well overall.  You can't see the little tank on his back in these photos, but it's all joined together.

My next cake-making adventure is two cakes for a joint 21st.  I have asked my friend Vic for some tips about icing the cake to look like a volleyball (she is a cake-making extraordinaire), and I'll be doing a trial-run next week.  Wish me luck!

-N-